
News classification
Contact us
- Add: No. 9, North Fourth Ring Road, Haidian District, Beijing. It mainly includes face recognition, living detection, ID card recognition, bank card recognition, business card recognition, license plate recognition, OCR recognition, and intelligent recognition technology.
- Tel: 13146317170 廖经理
- Fax:
- Email: 398017534@qq.com
Rapidly achieve face detection in face recognition
Rapidly achieve face detection in face recognition
Rapidly achieve face detection in face recognition
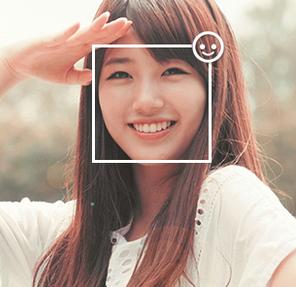
The current face recognition technology has been widely used, and its application in the payment field, authentication, and beauty cameras. Students using the iPhone should be familiar with the following features
The iPhone's photo has a "person" function that recognizes and categorizes the face in the photo. The principle behind it is also face recognition.
The
This article mainly describes how to use Python to implement face detection. Face detection is the basis of face recognition. The purpose of face detection is to identify the face in the photo and locate facial features. Face recognition further tells you who the person is on the basis of face detection.
Well, the introduction is here. Next, start preparing our environment.
Ready to work
The face detection in this article is based on dlib, and dlib relies on Boost and cmake. Therefore, you need to install these packages first. Take Ubuntu as an example:
$ sudo apt-get install build-essential cmake
$ sudo apt-get install libgtk-3-dev
$ sudo apt-get install libboost-all-dev
1
2
3
4
We also use numpy, opencv in our program, so we also need to install these libraries:
$ pip install numpy
$ pip install scipy
$ pip install opencv-python
$ pip install dlib
1
2
3
4
5
Face detection based on pre-trained model data, from here can be down to the model data
Http://dlib.net/files/shape_predictor_68_face_landmarks.dat.bz2
After downloading to the local path, extract it and note the extracted file path, which will be used in the program.
Dlib face feature points
The model data downloaded above is used to estimate the coordinate positions of the 68 feature points (x, y) on the human face. The positions of the 68 coordinate points are as shown in the following figure:
Our program will consist of two steps:
The first step is to detect the area of the face in the photo
In the second part, the organs (eyes, nose, mouth, chin, eyebrows) are further detected in the detected face area
Face detection code
Let's first define a few tool functions:
Def rect_to_bb(rect):
x = rect.left()
y = rect.top()
w = rect.right() - x
h = rect.bottom() - y
Return (x, y, w, h)
1
2
3
4
5
6
7
The rect in this function is the output of the dlib face detection. This transforms a rect into a sequence whose contents are the boundary information of a rectangular area.
Def shape_to_np(shape, dtype="int"):
Coords = np.zeros((68, 2), dtype=dtype)
For i in range(0, 68):
Coords[i] = (shape.part(i).x, shape.part(i).y)
1
2
3
4
<span class="k">return</span> <span class="n">coords</span>
1
2
The shape in this function is the output of the dlib facial feature detection. A shape contains 68 points of the previously mentioned facial features. This function converts shape to Numpy array for later processing.
Def resize(image, width=1200):
r = width * 1.0 / image.shape[1]
Dim = (width, int(image.shape[0] * r))
Resized = cv2.resize(image, dim, interpolation=cv2.INTER_AREA)
Return resized
1
2
3
4
5
6
The image in this function is the image we want to detect. At the end of the face detection process, we will show the results of the test to verify the picture, do resize here to avoid the picture is too large, beyond the scope of the screen.
Next, start our main program section
Import sys
Import numpy as np
Import dlib
Import cv2
If len(sys.argv) < 2:
Print "Usage: %s <image file>" % sys.argv[0]
Sys.exit(1)
Image_file = sys.argv[1]
Detector = dlib.get_frontal_face_detector()
Predictor = dlib.shape_predictor("shape_predictor_68_face_landmarks.dat")
1
2
3
4
5
6
We read the image of the face to be detected from the sys.argv[1] parameter, and then initialize the face region detection detector and the face feature detection predictor. The parameters in shape_predictor are the paths of the files we extracted before.
Image = cv2.imread(image_file)
Image = resize(image, width=1200)
Gray = cv2.cvtColor(image, cv2.COLOR_BGR2GRAY)
Rects = detector(gray, 1)
1
2
3
4
5
Before detecting the feature area, we must first detect the face area. This code calls opencv to load the image, resize it to the appropriate size, convert it to a grayscale image, and finally detect the face area with the detector. Because a photo may contain multiple faces, this is an array of rects containing information for multiple faces.
For (i, rect) in enumerate(rects):
Shape = predictor(gray, rect)
Shape = shape_to_np(shape)
The current face recognition technology has been widely used, and its application in the payment field, authentication, and beauty cameras. Students using the iPhone should be familiar with the following features
The iPhone's photo has a "person" function that recognizes and categorizes the face in the photo. The principle behind it is also face recognition.
The
This article mainly describes how to use Python to implement face detection. Face detection is the basis of face recognition. The purpose of face detection is to identify the face in the photo and locate facial features. Face recognition further tells you who the person is on the basis of face detection.
Well, the introduction is here. Next, start preparing our environment.
Ready to work
The face detection in this article is based on dlib, and dlib relies on Boost and cmake. Therefore, you need to install these packages first. Take Ubuntu as an example:
$ sudo apt-get install build-essential cmake
$ sudo apt-get install libgtk-3-dev
$ sudo apt-get install libboost-all-dev
1
2
3
4
We also use numpy, opencv in our program, so we also need to install these libraries:
$ pip install numpy
$ pip install scipy
$ pip install opencv-python
$ pip install dlib
1
2
3
4
5
Face detection based on pre-trained model data, from here can be down to the model data
Http://dlib.net/files/shape_predictor_68_face_landmarks.dat.bz2
After downloading to the local path, extract it and note the extracted file path, which will be used in the program.
Dlib face feature points
The model data downloaded above is used to estimate the coordinate positions of the 68 feature points (x, y) on the human face. The positions of the 68 coordinate points are as shown in the following figure:
Our program will consist of two steps:
The first step is to detect the area of the face in the photo
In the second part, the organs (eyes, nose, mouth, chin, eyebrows) are further detected in the detected face area
Face detection code
Let's first define a few tool functions:
Def rect_to_bb(rect):
x = rect.left()
y = rect.top()
w = rect.right() - x
h = rect.bottom() - y
Return (x, y, w, h)
1
2
3
4
5
6
7
The rect in this function is the output of the dlib face detection. This transforms a rect into a sequence whose contents are the boundary information of a rectangular area.
Def shape_to_np(shape, dtype="int"):
Coords = np.zeros((68, 2), dtype=dtype)
For i in range(0, 68):
Coords[i] = (shape.part(i).x, shape.part(i).y)
1
2
3
4
<span class="k">return</span> <span class="n">coords</span>
1
2
The shape in this function is the output of the dlib facial feature detection. A shape contains 68 points of the previously mentioned facial features. This function converts shape to Numpy array for later processing.
Def resize(image, width=1200):
r = width * 1.0 / image.shape[1]
Dim = (width, int(image.shape[0] * r))
Resized = cv2.resize(image, dim, interpolation=cv2.INTER_AREA)
Return resized
1
2
3
4
5
6
The image in this function is the image we want to detect. At the end of the face detection process, we will show the results of the test to verify the picture, do resize here to avoid the picture is too large, beyond the scope of the screen.
Next, start our main program section
Import sys
Import numpy as np
Import dlib
Import cv2
If len(sys.argv) < 2:
Print "Usage: %s <image file>" % sys.argv[0]
Sys.exit(1)
Image_file = sys.argv[1]
Detector = dlib.get_frontal_face_detector()
Predictor = dlib.shape_predictor("shape_predictor_68_face_landmarks.dat")
1
2
3
4
5
6
We read the image of the face to be detected from the sys.argv[1] parameter, and then initialize the face region detection detector and the face feature detection predictor. The parameters in shape_predictor are the paths of the files we extracted before.
Image = cv2.imread(image_file)
Image = resize(image, width=1200)
Gray = cv2.cvtColor(image, cv2.COLOR_BGR2GRAY)
Rects = detector(gray, 1)
1
2
3
4
5
Before detecting the feature area, we must first detect the face area. This code calls opencv to load the image, resize it to the appropriate size, convert it to a grayscale image, and finally detect the face area with the detector. Because a photo may contain multiple faces, this is an array of rects containing information for multiple faces.
For (i, rect) in enumerate(rects):
Shape = predictor(gray, rect)
Shape = shape_to_np(shape)
PREVIOUS:用机器学习方法提高图片的清晰度
NEXT:Target classification in AI computer vis